The documentation set for this product strives to use bias-free language. For the purposes of this documentation set, bias-free is defined as language that does not imply discrimination based on age, disability, gender, racial identity, ethnic identity, sexual orientation, socioeconomic status, and intersectionality. Exceptions may be present in the documentation due to language that is hardcoded in the user interfaces of the product software, language used based on RFP documentation, or language that is used by a referenced third-party product. Learn more about how Cisco is using Inclusive Language.
This document describes how to regenerate the certificates signed by a Certificate Authority (CA) in Cisco Unified Communications Manager (CUCM).
Cisco recommends that you have knowledge of these topics:
The information in this document was created from the devices in a specific lab environment. All of the devices used in this document started with a cleared (default) configuration. If your network is live, ensure that you understand the potential impact of any command.
Note: For Self-Signed certificate regeneration, refer to the Certificate Regeneration Guide. For CA-Signed Multi-SAN certificate regeneration, refer to the Multi-SAN Certificate Regeneration Guide
To understand the impact of each certificate and its regeneration, refer to the Self-Signed Regeneration Guide.
Each Certificate Signing Request (CSR) type has different key usages and those are required in the Signed Certificate. The Security Guide includes a table with the required key usages for each type of certificate.
To change the Subject Settings (Locality, State, Organization Unit, and so on) run this command:
The Tomcat certificate is regenerated automatically after you run the set web-security command. The new Self-Signed certificate is not applied unless the Tomcat service is restarted. Please refer to these guides for more information about this command:
The steps to regenerate Single-Node certificates in a CUCM cluster signed by a CA are listed for each type of certificate. It is not necessary to regenerate all the certificates in the cluster if they have not expired.
Caution: Verify SSO is disabled in the cluster ( CM Administration > System > SAML Single Sign-On ). If SSO is enabled, it must be disabled and then enabled once the Tomcat certificate regeneration process is completed.
On all the nodes (CallManager and IM&P) of the cluster:
Step 1. Navigate to Cisco Unified OS Administration > Security > Certificate Management > Find and verify the expiration date of the Tomcat certificate.
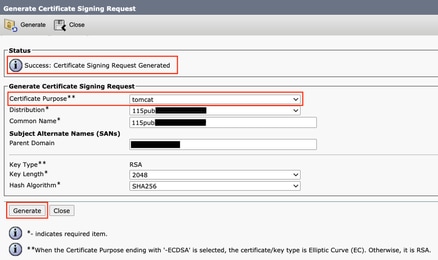
Step 2. Click Generate CSR > Certificate Purpose: tomcat . Select the desired settings for the certificate, then click Generate . Wait for the success message to appear and click Close .
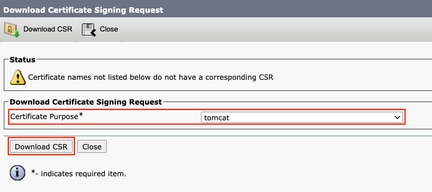
Step 3. Download the CSR. Click Download CSR , select Certificate Purpose: tomcat , and click Download .
Step 4. Send the CSR to the Certificate Authority.
Step 5. The Certificate Authority returns two or more files for the signed certificate chain. Upload the certificates in this order:
Note: Some CAs do not provide an intermediate certificate. If only the Root certificate was provided, this step can be omitted.
Note: At this point, CUCM compares the CSR and the uploaded CA-signed certificate. If the information matches, the CSR disappears, and the new CA-signed certificate is uploaded. If you receive an error message after the certificate is uploaded, refer to the Upload Certificate Common Error Messages section.
Step 6. To get the new certificate applied to the server, the Cisco Tomcat service needs to be restarted via CLI (start with Publisher, and then subscribers, one at a time), use the command utils service restart Cisco Tomcat .
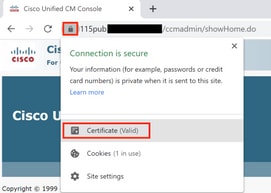
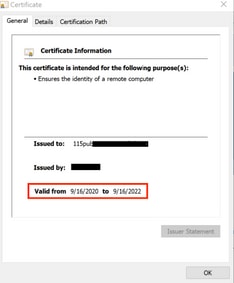
To validate the Tomcat certificate is now used by CUCM, navigate to the web page of the node and select Site Information (Lock Icon) in the Browser. Click the certificate option, and verify the date of the new certificate.
Caution: Do not regenerate CallManager and TVS certificates at the same time. This causes an unrecoverable mismatch to the installed ITL on endpoints which requires the removal of the ITL from ALL endpoints in the cluster. Finish the entire process for CallManager, and once the phones are registered back, start the process for the TVS.
Note: To determine if the cluster is in Mixed Mode, navigate to Cisco Unified CM Administration > System > Enterprise Parameters > Cluster Security Mode (0 == Non-Secure; 1 == Mixed Mode).
For all the CallManager nodes of the cluster:
Step 1. Navigate to Cisco Unified OS Administration > Security > Certificate Management > Find and verify the expiration date of the CallManager certificate.
Step 2. Click Generate CSR > Certificate Purpose: CallManager . Select the desired settings for the certificate, then click Generate . Wait for the success message to appear and click Close .
Step 3. Download the CSR. Click Download CSR. Select Certificate Purpose: CallManager and click Download .
Step 4. Send the CSR to the Certificate Authority .
Step 5. The Certificate Authority returns two or more files for the signed certificate chain. Upload the certificates in this order:
Note: Some CAs do not provide an intermediate certificate. If only the Root certificate was provided, this step can be omitted.
Note: At this point, CUCM compares the CSR and the uploaded CA-signed certificate. If the information matches, the CSR disappears, and the new CA-signed certificate is uploaded. If you receive an error message after the certificate is uploaded, refer to the Upload Certificate Common Error Messages section.
Step 6. If the cluster is in Mixed Mode, update the CTL before the services restart: Token or Tokenless. If the cluster is in Non-Secure Mode, skip this step and proceed with the services restart.
Step 7. To get the new certificate applied to the server, the required services must be restarted (only if the service runs and is active). Navigate to:
Step 8. Reset all the phones:
Note: Monitor device registration via RTMT. Once all phones register back you can proceed with the next certificate type.
Caution: A backup or restore task must not be active when the IPSec certificate is regenerated.
For all the nodes (CallManager and IM&P) of the cluster:
Step 1. Navigate to Cisco Unified OS Administration > Security > Certificate Management > Find and verify the expiration date of the ipsec certificate.
Step 2. Click Generate CSR > Certificate Purpose: ipsec. Select the desired settings for the certificate, then click Generate. Wait for the success message to appear and then click Close.
Step 3. Download the CSR. Click Download CSR. Select Certificate Purpose ipsec and click Download.
Step 4. Send the CSR to the Certificate Authority.
Step 5. The Certificate Authority returns two or more files for the signed certificate chain. Upload the certificates in this order:
Note: Some CAs do not provide an intermediate certificate. If only the Root certificate was provided, this step can be omitted.
Note: At this point, CUCM compares the CSR and the uploaded CA-signed certificate. If the information matches, the CSR disappears, and the new CA-signed certificate ia uploaded. If you receive an error message after the certificate is uploaded, please refer to the Upload Certificate Common Error Messages < /strong>section.
Step 6. To get the new certificate applied to the server, the required services must be restarted (only if the service runs and is active). Navigate to:
Note: To determine if the cluster is in Mixed Mode, navigate to Cisco Unified CM Administration > System > Enterprise Parameters > Cluster Security Mode (0 == Non-Secure; 1 == Mixed Mode).
Note: CAPF service only runs in the Publisher, and that is the only certificate used. It is not necessary to get Subscriber nodes signed by a CA because they are not used. If the certificate is expired in the Subscribers and you would like to avoid the alerts of expired certificates, you can regenerate subscriber CAPF certificates as Self-Signed. For more information, see CAPF Certificate as Self-Signed.
In the Publisher:
Step 1. Navigate to Cisco Unified OS Administration > Security > Certificate Management > Find and verify the expiration date of the CAPF certificate.
Step 2. Click Generate CSR > Certificate Purpose: CAPF. Select the desired settings for the certificate, then click Generate. Wait for the success message to appear and click Close.
Step 3. Download the CSR. Click Download CSR. Select Certificate Purpose CAPF and click Download.
Step 4. Send the CSR to the Certificate Authority.
Step 5. The Certificate Authority returns two or more files for the signed certificate chain. Upload the certificates in this order:
Note: Some CAs do not provide an intermediate certificate. If only the Root certificate was provided, this step can be omitted.
Note: At this point, CUCM compares the CSR and the uploaded CA-signed certificate. If the information matches, the CSR disappears, and the new CA-signed certificate ia uploaded. If you receive an error message after the certificate is uploaded, please refer to the Upload Certificate Common Error Messages section.
Step 6. If the cluster is in Mixed Mode, update the CTL before the services restart: Token or Tokenless. If the cluster is in Non-Secure Mode, skip this step and proceed with the service restart.
Step 7. To get the new certificate applied to the server the required services must be restarted (only if the service runs and is active). Navigate to:
Step 8. Reset all the phones:
Note: Monitor device registration via RTMT. Once all phones register back you can proceed with the next certificate type.
Caution: Do not regenerate CallManager and TVS certificates at the same time. This causes an unrecoverable mismatch to the installed ITL on endpoints which requires the removal of the ITL from ALL endpoints in the cluster. Finish the entire process for CallManager and once the phones are registered back, start the process for the TVS.
For all the TVS nodes of the cluster:
Step 1. Navigate to Cisco Unified OS Administration > Security > Certificate Management > Find and verify the expiration date of the TVS certificate.
Step 2. Click Generate CSR > Certificate Purpose: TVS. Select the desired settings for the certificate, then click Generate. Wait for the success message to appear and click Close.
Step 3. Download the CSR. Click Download CSR. Select Certificate Purpose TVS and click Download.
Step 4. Send the CSR to the Certificate Authority.
Step 5. The Certificate Authority returns two or more files for the signed certificate chain. Upload the certificates in this order:
Note: Some CAs do not provide an intermediate certificate. If only the Root certificate was provided, this step can be omitted.
Note: At this point, CUCM compares the CSR and the uploaded CA-signed certificate. If the information matches, the CSR disappears, and the new CA-signed certificate is uploaded. If you receive an error message after the certificate is uploaded, refer to the Upload Certificate Common Error Messages section.
Step 6. To get the new certificate applied to the server, the required services must be restarted (only if the service runs and is active). Navigate to:
Step 7. Reset all the phones:
Note: Monitor device registration via RTMT. Once all phones register back, you can proceed with the next certificate type.
In this section are listed some of the most common Error Messages when a CA-signed certificate is uploaded.
This error means the root or intermediate certificate was not uploaded to the CUCM. Verify those two certificates were uploaded as trust-store before the service certificate is uploaded.
This error appears when a CSR does not exist for the certificate (tomcat, callmanager, ipsec, capf, tvs). Verify the CSR was created before and the certificate was created based on that CSR. Important points to keep in mind:
This error appears when the certificate provided by the CA has a different public key than the one sent in the CSR file. Possible reasons are:
To verify the CSR and certificate public key match, there are multiple tools online such as SSL.
Another possible error for the same issue is “The file /usr/local/platform/upload/certs//tomcat.der could not be uploaded.” This depends on the CUCM version.
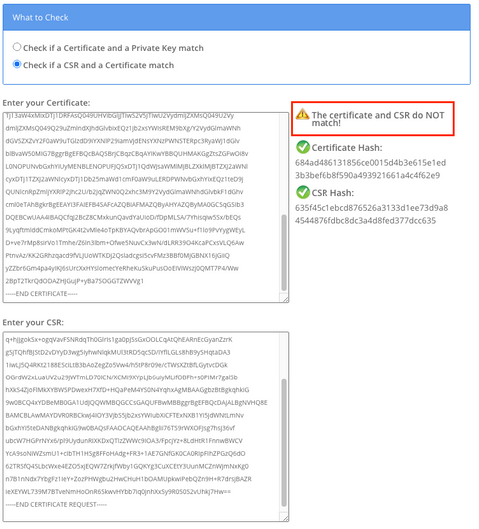
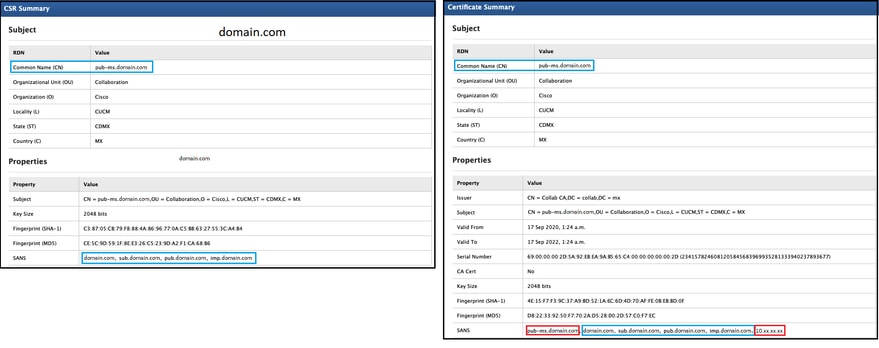
The SANs between the CSR and the Certificate must be the same. This prevents certification for Domains that are not allowed. To verify the SAN mismatch, these are the next steps:
1. Decode the CSR and the certificate (base 64). There are different decoders available online, such as the Decoder.
2. Compare the SAN entries and verify all of them match. The order is not important, but all the entries in the CSR must be the same in the Certificate.
For example, the CA-signed certificate has two extra SAN entries added, the Common Name of the certificate and an extra IP address.
3. Once you have identified the SAN does not match, there are two options to fix this:
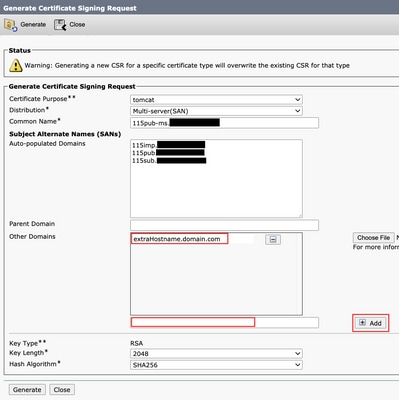
To modify the CSR created by CUCM:

3. To add an Alternative Name apart from the ones autocompleted by CUCM:
b. If the certificate is Single Node, use the set web-security command. This command applies even for Multi-SAN certificates. (Any kind of domain can be added, also IP addresses are permitted.)
CUCM was designed to store only one certificate with the same Common Name and same certificate type. This means that if a certificate that is tomcat-trust already exists in the database and it needs to be replaced with a recent one with the same CN, CUCM removes the old certificate and replaces it with the new one.
There are some cases when CUCM does not replace the old certificate: